Stucco Repair Isn’t Enough – Learn How to Prevent Moisture and Stucco Damage

Philadelphia Stucco Repair is a quick fix for surface damage. However, it doesn’t address the underlying issue that caused the problem. This is why it’s important to inspect stucco regularly and address any hairline cracks promptly to prevent moisture damage.

When repairing stucco, it’s essential to choose paint that is compatible with the material. This will help ensure that the repaired area blends seamlessly with the surrounding surface.

Stucco is tough and durable, but it’s not immune to weather-related damage. Rain and wind can cause abrasive particles to scratch or dent stucco surfaces, and moisture that penetrates the surface can lead to mold and structural damage. Identifying and fixing the source of water penetration is the key to protecting stucco from future problems.

Water Damage

Moisture can damage stucco by causing rot and mold, as well as causing structural instability or even a collapsed foundation. If you suspect moisture is damaging your stucco, consult a specialist and take immediate action to prevent further damage.

Cracks and Holes

Hairline cracks caused by thermal expansion and contraction are common in stucco walls, but if these cracks don’t stop on their own or require intervention from a professional, they can snowball into more extensive repairs. It’s important to perform regular inspections of your stucco, especially in warm and cool temperatures, to identify potential problems before they become serious.

Efflorescence and Color Fading

Heavy rains can bring water-soluble salts to the surface of stucco, resulting in unsightly white streaks or patches known as efflorescence. This problem is worsened by droughts or other conditions that promote water retention and movement within the masonry.

Regular cleaning and routine washing with a mild detergent can help to preserve the appearance of your stucco. Also, securing or storing loose items that can become projectiles in strong winds and maintaining proper drainage are essential to protect your stucco from damage caused by debris. Adding a protective coating like Cool Life can further enhance your stucco’s water resistance, as well as provide protection against damage from impact and earthquake vibrations. The process of applying a protective coating can be complex, so it’s best to consult with professionals.

Stains

Staining and discoloration are often the first signs that stucco needs attention. While stains and discoloration can be caused by a variety of factors, it is important to recognize them early so that they can be addressed quickly and prevent further damage to the material.

If the problem is isolated to a few areas, a simple repair may be sufficient. However, if it is widespread or if the same spots keep reappearing, this is probably a sign that there are larger issues going on beneath the surface and that a full remediation is needed.

Water intrusion is one of the most common problems that can cause stains, discoloration and other issues with stucco. It can be caused by rainwater, sprinklers or even by the wind rubbing against the stucco walls. If left untreated, water intrusion can lead to severe damage that requires extensive and costly repairs.

In addition to causing structural damage, moisture infiltration can also promote the growth of mold and mildew. To protect against this, it is important to routinely inspect your home for mold and mildew. This should include looking behind pictures hanging on exterior walls, in open joist cavities and attic spaces.

Stucco is a long-lasting material that can be highly resistant to cracking and other forms of damage, but it will eventually show signs of wear and tear. Recognizing these signs early is important to maintain the aesthetic and integrity of the material. Keeping up with regular inspections, gentle cleaning and applying a protective sealant will help to extend the lifespan of your stucco home.

Cracks

If your stucco is exhibiting signs of mold and moisture, it’s likely time to consider remediation rather than patching. Musty odors and bubbling and blistering indicate that the wall may be leaking and trapping water behind it. This water can lead to structural damage and create conditions for fungal growth.

Moisture intrusion is the biggest cause of cracking in stucco. If your stucco is showing these blemishes, it’s important to consult with an experienced contractor for advice. In most cases, a thorough inspection will reveal the underlying cause of the problem and the best solutions.

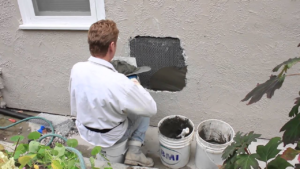
If the cracks are isolated and not extending, patching them with cement or various caulks might be sufficient to stop the cracks from growing and reoccurring. However, this method does not address the underlying issue and should only be used as a temporary solution.

The first thing to do is to wet down the wall, around and over the cracks. This will help with any standing dirt and moisture in and around the cracks, making it much easier to clean up. Next, use a mason’s chisel to widen the crack at least a quarter inch. This will help to prevent the crack from opening up again as temperatures fluctuate and it will give you a good surface for the caulk to adhere to. Lastly, apply a generous bead of paintable caulk to the entire crack. It is best to choose a caulk with elastomeric properties so it can stretch and move with the building as it shifts over time.

This step will also require a little work with a notched trowel to “scratch” the mud and make grooves that help future coats to adhere. After the mud has dried and cured, you can repaint the repaired area to blend it into the rest of the stucco.

Impact Damage

Stucco is a durable, versatile building material that looks great and is long-lasting. However, it’s not invincible and is susceptible to damage from various environmental factors. These can include rain, wind, sunlight, and birds. Damage to stucco can lead to cracking, discoloration, and moisture issues. Knowing how to spot these problems can help you address them early and limit your costs.

Stucco repair is a smart investment. It can prevent minor damages from escalating into major structural issues and save homeowners money on costly replacements. Moisture intrusion, for instance, can lead to mold growth and internal wall damage if it isn’t addressed promptly.

Early detection of moisture damage is important, and should be a top priority during regular inspections. Look for signs like musty smells and visual evidence of mold, or signs of water infiltration such as bubbling or blistering. In addition, use a moisture meter to test the stucco surface for dampness. High readings indicate that the underlying layers, such as the brown coat and lath, are saturated, which is a sign of water damage.

Water damage is another common cause of stucco repairs, and should be addressed immediately. Identifying and fixing the root of the issue is essential, as water infiltration can cause other problems like wood rot, corrosion, and mold growth. In addition, moisture can also lead to structural damage and weaken the structure. To prevent moisture problems, regularly clean the stucco using a soft brush or low-pressure water. In addition, a protective sealant can improve water resistance and guard against moisture-related problems. It is a good idea to apply this coating to all areas of the exterior, including around windows and doors.

Structural Damage

Stucco can be susceptible to structural damage caused by water infiltration. Water penetration can deteriorate the lath and other material behind the stucco, leading to rot, mold growth, and ultimately structural damage. To prevent moisture intrusion, proper drainage is essential. This is why it’s vital to install gutters and seal cracks around the foundation and home perimeter.

Structural damage can be costly for homeowners, and it can also reduce the value of a property. Potential buyers may be hesitant to invest in a home with visible structural damage or moisture problems, and they might negotiate for significantly lower prices.

If you notice significant signs of damage, it’s important to consult with a professional as soon as possible. A reputable stucco repair expert can help you decide whether to pursue repairs or explore more comprehensive services like remediation.

The key difference between repair and remediation is identifying the root cause of the damage. Repairs focus on fixing surface issues, while remediation involves addressing the underlying problems that are causing damage. For example, if your stucco is deteriorating faster than it should due to improper installation or foundation shifts, remediation might be a better option than repair.

Stucco can provide many benefits to your home, but it’s crucial to inspect it regularly for damage and maintenance needs. Isolated cracks that don’t show any signs of spreading are usually sufficient for repair, but stains, bubbling, or blistering are serious indications of moisture problems. A professional inspection and timely repairs can save you a lot of money, time, and headache in the long run. With a little attention, your stucco can last for years to come.

Drain Cleaning – How to Get Rid of Clogged Drains

Clogged drains can cause real neck pain. They also cause unpleasant odors and can lead to serious plumbing problems over time.

Regular drain cleaning can help prevent clogs, extend the life of your pipes, and ensure a safe and sanitary living environment for your family. Contact Drain Cleaning Perth now!

Clogged drains are one of the most common and frustrating problems homeowners face. They can be caused by a wide range of materials, from hair and food scraps to grease and soap scum. While reaching for a chemical drain cleaner may be tempting, these products can do more harm than good.

Chemical drain cleaners work by creating a chemical reaction with the substance that is causing the clog. Caustic drain cleaners, such as lye or caustic potash, are bases that give electrons to the clogging material and release hydroxide ions to dissolve it. Oxidizing drain cleaners, on the other hand, use substances such as household bleaches or peroxides to liquefy organic material and release heat. Both cleaners are typically heavier than water and can move through standing water to reach the clog.

However, these chemical reactions can also damage your pipes. Most chemical drain cleaners generate significant heat, which can melt or warp plastic pipes. This can lead to leaks and serious structural issues in your home. They can also cause corrosion in metal pipes, especially if they come into contact with water.

Moreover, these chemicals are not good for the environment. They can contaminate groundwater and potentially poison local wildlife. Lastly, they can also pose a health risk to your family. Chemical drain cleaners often release toxic fumes that can irritate your nose, eyes and throat. They can also affect your indoor air quality (IAQ) and trigger asthma and other respiratory conditions.

Fortunately, there are safe and effective alternatives to chemical drain cleaners. You can try natural DIY solutions such as hot water and baking soda or vinegar, which are more environmentally friendly and don’t pose a risk to your health or the environment.

Hydro-Jetting

While snakes puncture clogs and augers can chip away at soft blockages, hydro jetting uses pressurized water to blast through even the most stubborn sewer lines. It’s a great option for commercial and municipal pipes with larger diameters that snakes and augers can’t handle, as well as homes with heavy use of grease.

The process involves connecting a hose to the drain and then using a powerful stream of water to remove debris, including tree roots, from the pipe. It’s important to note that this is a highly specialized and dangerous procedure and should only be performed by trained professionals who have the right equipment and know how to take proper safety precautions.

During the process, the plumber might also utilize a rooter to break up thick roots that have invaded the sewage line before attacking them with the water jets. They’ll also choose a nozzle with varying degrees of power and force, depending on the type of debris being removed. Some nozzles are designed to get around corners while others have wider back sprays for breaking up and dissolving sludge.

Hydro jetting also does a better job of eliminating odors caused by food residue or rotting garbage that’s lodged inside the pipes. This is because it scoures the sides of the pipes, eliminating any lingering bacteria. Additionally, a video inspection can help the plumber to identify any issues with the pipes and their waterproof coating before hydro jetting, preventing future problems.

Regardless of the severity and location of the clog, there’s usually no need to resort to DIY methods like drain snakes or chemical drain cleaners. Instead, contact a professional plumbing service to perform a thorough point-by-point inspection with hydro jetting to ensure the integrity of your pipes.

Enzyme Cleaners

Enzyme cleaners are an eco-friendly alternative to chemical drain cleaners. They work by harnessing nature’s power to speed up organic decomposition and eliminate odor. Enzymes break down the proteins, fats, and starches that make up most stains and organic buildup. This allows the contaminants to be washed away easily with water, leaving surfaces clean and odor-free.

These non-toxic cleaners are effective for removing organic soils, including pet urine and feces, spoiled food, mildew, and coffee grounds. They are also useful in tackling tough grease deposits. They can be used on any material or surface that can get wet, including fabrics, but are not recommended for use on rayon and silk.

Unlike chemical cleaners, enzyme cleaners do not have any harmful ingredients or compounds and do not produce toxic fumes. However, they require warm water to activate and must remain in contact with the stain for at least 15 minutes to be fully effective. They should be kept out of sunlight, as UV radiation can destroy the enzymes and prevent them from functioning properly.

In addition to temperature, the concentration of bacterial species in a drain cleaner is an important factor in its effectiveness. For this reason, it is important to choose a product with a minimum ufc/mL (unit-forming colony per milliliter) count for the best results.

You can make your own enzyme cleaner at home by combining chopped citrus peels, lukewarm water, brown sugar, and yeast in a plastic bottle. Then, let it ferment in a warm area for at least a month. The resulting liquid can be sprayed onto a variety of surfaces, such as upholstery, fabric, and carpet.

To test how well your homemade enzymatic cleaner works, pour it over a piece of dry cat food. If it dissolves completely, the enzymatic cleaner has successfully broken down the protein in the cat food.

Mechanical Drain Snakes

Also known as plumber’s augers or “snakes”, these long steel cable tools allow you to mechanically bore through and retrieve clogs that sink plungers and chemical cleaners can’t. Like plungers, drain snakes use a mechanical approach, but their core components and mechanism let them physically latch onto, then chew through or dislodge obstructions.

First, choose a plumbing snake suited to the type of clog you’re facing. For example, if your drain is blocked by solidified grease or soap scum, you might need a thinner pipe-sized cable with a smaller auger head. If your clog stems from a broken pipe or sewer backup, on the other hand, you might require a sturdier, longer cable with a larger head.

After that, prep the pipe or drain by either removing the p-trap (the curved piping under the sink) or by gaining access to the trap arm. Then, uncoil the snake’s cable and start feeding it into the pipe. Be sure to feed it slowly and steadily, as attempting to force the cable into an obstruction can damage the drain entrance or pipe.

As you feed the snake through your pipes, listen and feel for any changes in resistance. This sensory feedback lets you know when the clog is grabbing or snaring something, which in turn lets you decide how to proceed. Be patient – some stubborn clogs may take multiple passes with the snake before they break loose completely. If you encounter a particularly stubborn or deep blockage, don’t hesitate to call in a professional plumber for assistance. And always remember: Prevent clogs by keeping big food scraps out of your garbage disposal, installing and regularly cleaning a grease trap or drain guard in kitchens, and using strainers or screens in bathtubs and sinks to catch larger debris before it can wash down the drain.

Video Inspection

A plumbing camera is the best tool for learning about the condition of pipes and drains. Because many pipes are located behind walls, under flooring, and underground, determining the cause of a problem can be difficult without the use of a plumbing video inspection. Having a plumber do this inspection at the beginning of a drain cleaning service can take all the guesswork out of locating a blockage or determining what sort of repairs may be needed. It can also help when purchasing a new home, as it will allow you to see exactly what state the plumbing is in before having to pay for any costly repair work.

Modern video pipe inspection equipment allows plumbers to send a miniaturized digital camera attached to a flexible cable into plumbing lines, which gives them a clear view of the inside of a drain or sewer line. The cameras are connected to monitors, and the feed can be recorded to show to a customer later.

The biggest benefit of using a plumbing camera is that it can be used to locate clogs and other problems in places where they might otherwise be missed. Some clogs can be hidden in small cracks and joints, or at sharp turns in pipes that would be impossible to spot with the naked eye. Using a plumbing camera can help locate these clogs and repair them before they become major problems that require extensive digging and damage to property.

Another big benefit of using a plumbing camera is that the video inspection can be used to identify the source of a blockage or damage, and determine the best way to address it. This allows plumbers to efficiently tackle a problem and minimize any damage that might be caused by invasive methods like pulling up floorboards or tearing out drywall. In addition, the ability to identify a problem quickly and accurately can reduce the need for harsh chemicals that can cause environmental damage.

Why Ceiling Insulation is a Cost-Effective Investment

Insulating your ceiling helps control temperature, save energy, and reduce noise. If your existing insulation has lost its thickness or is leaking, it may be time for a top-up.

Building codes and regulations also require insulation, which adds value to your home and prevents potential problems down the road. But how do you choose the right product? Contact Ceiling Insulation Perth now!

Insulation is a cost-effective investment that will save money and energy in the long run. By preventing heat loss through the ceiling, heating and cooling costs can be reduced, and your home will stay more comfortable all year round.

Adding insulation to your home is usually an inexpensive DIY project. However, the type of insulation you choose will impact the total cost. For example, spray foam requires more expertise and equipment to install properly. It may also be more expensive than fiberglass batts, rolls, or rigid foam boards.

Different types of insulation have different R-values or resistance to heat flow. The higher the R-value, the more effective it will be. The insulation you choose will also depend on your climate, as some types are better suited to specific weather conditions.

The most popular and affordable type of ceiling insulation is fiberglass roll or batting. It is available in a variety of thicknesses to match your needs. Fiberglass can be purchased at most hardware stores. However, it is best to have the installation done by a professional to ensure proper fit and coverage.

Other types of insulation can also be installed in the ceiling, including rock wool, polyester, and cellulose. These insulation materials are more expensive than fiberglass but offer a higher R-value. They also require a more thorough installation process since they must be placed between the home’s R-value and contain silica. Due to safety precautions, theybetwehome’s should only be installed by a professional.

If you have a new build, your electrician will likely include the ceiling insulation as part of your electrical work. In addition, the Australian Government’s Energy Efficient Home Loan Scheme is a great way to help offset the costs of installing or upgrading your ceiling insulation. You can apply for a loan through Brighte, and the scheme will pay for a portion of your installation costs.

While the upfront costs of installing insulation in your roof and ceiling may seem costly, the return on investment is excellent. With heating and cooling accounts for a significant amount of your utility expenses, insulation can help you lower your energy bills by regulating the temperature in your home during the winter and blocking outside temperatures during the summer.

Energy Efficiency

As most homeowners have experienced, rising electricity and gas prices make every household budget stretch. However, there are steps you can take to minimise energy consumption and soften the blow on your energy bills. One of the most important is insulation. Adding insulation to your home or building is a cost-effective way to improve energy efficiency and reduce heating and cooling costs.

Insulation is effective because it slows the transfer of heat between warm and cold areas, allowing your building to better regulate temperature without relying on expensive heating and air conditioning systems. This means you can lower your energy costs while improving comfort and protecting the environment.

In addition, insulation reduces the amount of heat that escapes through your ceiling and into outer spaces. The energy loss that occurs in uninsulated structures can add up to significant amounts over time. By reducing this, you can reduce your electricity and energy bills significantly.

There are many different types of insulation, each with its own R-value (or thermal resistance rating). The higher the R-value, the more effective the insulation is. When choosing insulation for your ceiling, be sure to select the right type for your needs. For example, loose fill insulation is great for attics and can be blown in or poured into gaps and corners to provide even coverage. It also has the advantage of being very versatile, making it suitable for a range of construction methods and materials.

It’s also worth checking if your utility company offers any programs to help you pay for the installation of insulation in your home. These can include rebates or energy-efficient tax credits. You may even be able to find a contractor who specialises in insulation installation for your local area.

The right ceiling insulation can help you save on your energy costs and make your home more comfortable all year round. You’ll be able to lower your energy bill, protect the environment, and improve your home’s value. In addition, it can suppress external noises and improve indoor air quality. So, if you’re looking for an easy way to improve your energy efficiency and make your home more comfortable, consider adding ceiling insulation to your home or building today!

Comfort

Suitable ceiling insulation acts as a thermal barrier to prevent heat from escaping the home in winter and slows down unwanted heat transfer in summer. This significantly improves the indoor comfort of a premise all year round and cuts energy costs in doing so. It also reduces noise transmission between floors and contributes to a more peaceful home environment.

If installed correctly, ceiling insulation can save up to 45% of your heating and cooling costs. It is important to note that this amount can be higher if you opt for a product with a higher R-Value, which will resist the flow of heat better. However, it is recommended that you hire a professional to install your insulation because they will ensure that it is placed properly and safely to provide maximum benefits.

Having a home without proper insulation is not only inefficient but it can lead to a host of problems including dampness, mould growth and excessive power bills. Installing polyester or glasswool ceiling batts will ensure that your home is protected from heat loss and gain and that your electricity expenses are minimized. If you are considering installing ceiling insulation, it is a worthwhile investment that will pay for itself over time. Contact Neo Thermal to find out more about our range of products or to book a free, no obligation quote. We service all areas of Connecticut and offer competitive pricing and quality products.

Noise Reduction

Suitable insulation is a key element in any home. It provides a sound barrier to reduce noise pollution within the premises and improves the general feeling of the space, making it more comfortable for its occupants. It also increases energy savings by serving as a thermal insulator, reducing heat transfer in winter and retarding unwanted heat flow during summer.

The best insulation materials are those that have been tested for their ability to reduce the transmission of airborne sounds. These are measured by their noise reduction coefficient (NRC). The higher the NRC rating, the better the insulation performs in terms of sound abatement. Cellulose insulation, for instance, has a NRC of 0.75 and is known to be very effective in this regard. Its ability to absorb sound waves helps to keep noise levels down, benefiting people in rooms upstairs and those below.

In addition, cellulose is fire resistant and helps to prevent the spread of flames through a structure. It is therefore particularly important when building new homes and modifying existing ones.

Another benefit of installing ceiling insulation is that it can reduce the risk of leaking roofs and the associated damage to internal ceilings. Insulation acts as a barrier to the passage of water, so when a leak does occur, it can be quickly identified and fixed.

When it comes to insulating a ceiling, blanket insulation or batts are a popular choice. These are pre-cut panels of fibreglass, rock wool or other materials that can be laid out between ceiling joists like a blanket. This type of installation is relatively straightforward and quick to do. It can be performed by the homeowner or a professional, depending on skill level.

Another option for insulating a ceiling is to use blown-in insulation. This is generally a more expensive option but it offers greater coverage and can be installed in hard to reach places. It is also made from small particles of cellulose, fiberglass or rock wool and is blown into walls, attics and other spaces using special equipment. This type of insulation is often considered to be more effective in reducing noise levels because it is more able to fill gaps and crevices where noise can travel through.